|
|
State of Wisconsin IM Training Handbook Release 10-02 March 16, 2010 |

View History
4.2.2 General Standards, Tips, and Tricks
4.2.6 Naming Conventions Used in IM Training
4.2.7 Adding a Table of Contents to the Project
4.2.8 Final Slide of the Project
4.2.9 Publishing and Saving Projects
In Captivate, set resolution to 720 x 540 from the New Project window in Captivate. If you've already created a project with different settings, resize the project by going to Project> Rescale>Preset Size> and choose the last option in the drop down box). This should be 720 x 540 Adobe Acrobat Connect Pro Server.
If the final output is not set to 720 x 540, some browsers and monitors won't show all of the content of the presentation.
From the Captivate Menu, choose Edit> Preferences.
Under Global> Defaults, use these settings.

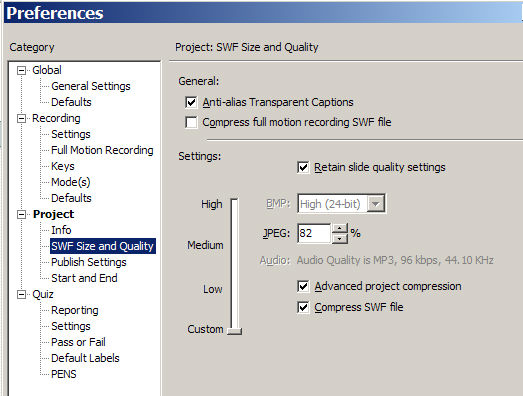
Under Project>SWF Size and Quality, use these settings.
Use Arial font size with a minimum of 24 and try to use plenty of white space on the page between paragraphs and any clip art.
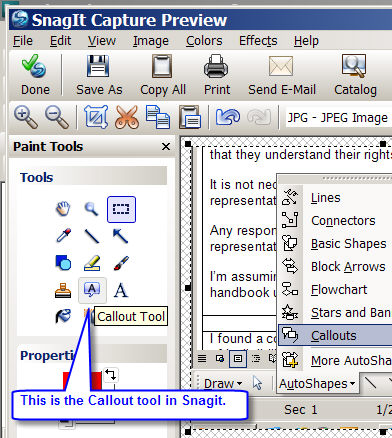
In MS Word and Snagit (See 5.2 Working With Snagit), text boxes with a pointer are called "Callouts." In Captivate, these are called "Captions." The Word documents that are the basis of an IM Training may contain many of these callouts. If the Captivate author converts screenshots (See 5.1 Collecting Screenshots) that have callouts, the text on the screenshot is no longer editable since it is a .jpg. For this reason, the Captivate author will recreate the Callouts as Captions in Captivate. That way, the text can easily be edited later without the need to create a new screenshot.
Example 1: Using Callouts from MS Word

Example 2: Using Callouts from Snagit
Example 3: a Caption in Captivate

Use a golden or yellow background instead of white. Use black text with an Arial font of size 14.
|
When a screenshot in Word or PPT has a callout, paste the screenshot without the callout and retype the text for any callouts using a caption in Captivate. |
Don’t use page numbering in PowerPoint or Captivate slides.
For Captivate, don’t use a timer for slides or allow a click on the slide to progress. They should click through slides only by using nav. Control.
Use the “Steel” playback control. If the Captivate project you're using doesn't have the right skin or playback control, use the Captivate template for New Worker Training found at L:\IM Training\New Worker\IM Modules\New Worker Style Guides\captivate templates\nwt_cp_template.cptl (Note: only DHS staff in 1 W Wilson St. can access this path.
To set 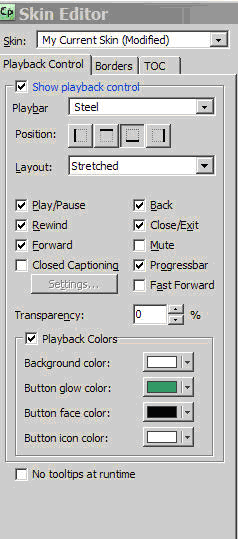 this manually, open the project and go to
Project> Skin Editor and choose “steel.” In the middle section only these options should be checked until we add audio and closed captioning:
Play/Pause,
rewind,
forward,
back,
close/exit, and
progressbar.
Check the “Playback colors and choose (in order) white, green, black, and white for the button and background colors.
Regardless of what terms Pathlore uses, we should use these terms consistently internally and in the trainings and in other written materials.
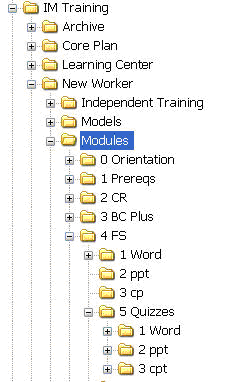
A Course is the high level name of all modules and trainings. An example of a course is all of IM New Worker Training.
A Module is a subset of a course. It bundles similar trainings together. An example is “Prerequisites.”
A Training can be a PDF, PowerPoint, or Captivate project within a module. An example is "Intro to CWW" within the Prerequisites module.
The Logical order of a course from largest to smallest entity is Course>Module>Training.
The scenarios that are used throughout training will now be called “Assessment Scenarios.”
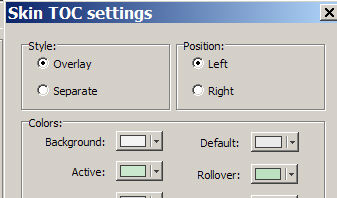
Captivate 4 allows you to add a Table of Contents (TOC) to a project. The TOC is collapsed in the upper left-hand corner of the final project by default.
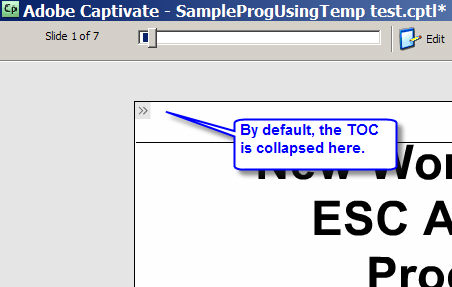
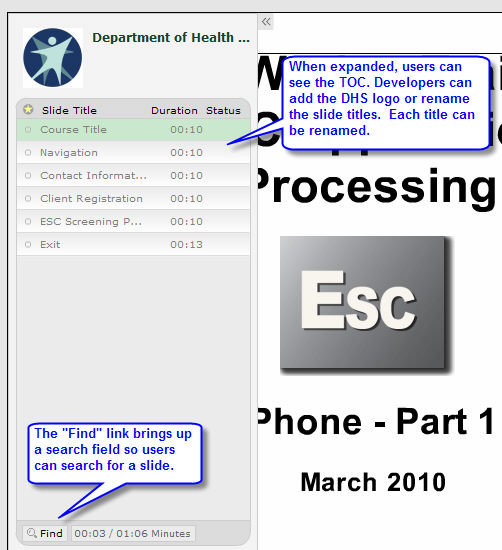
Users can click on the double arrows to show the TOC. Each page listed is a link to that page. This allows users to go back and forth in the presentation easly. There is also a search function that allows users to search for a page name. Only text entered in the TOC by the developer can be searched here.
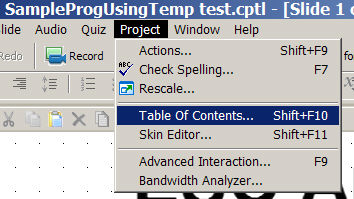
To add or edit the TOC, in Captivate, go to Project>Table of Contents.
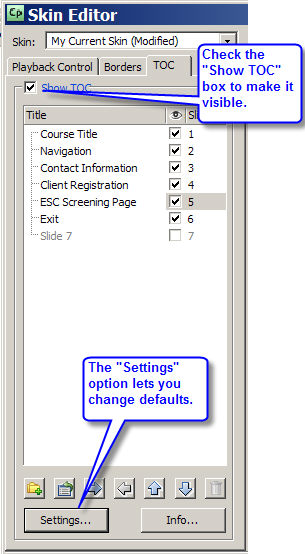
Make sure the Overlay Style is selected. This let's the user hide the TOC if they want.
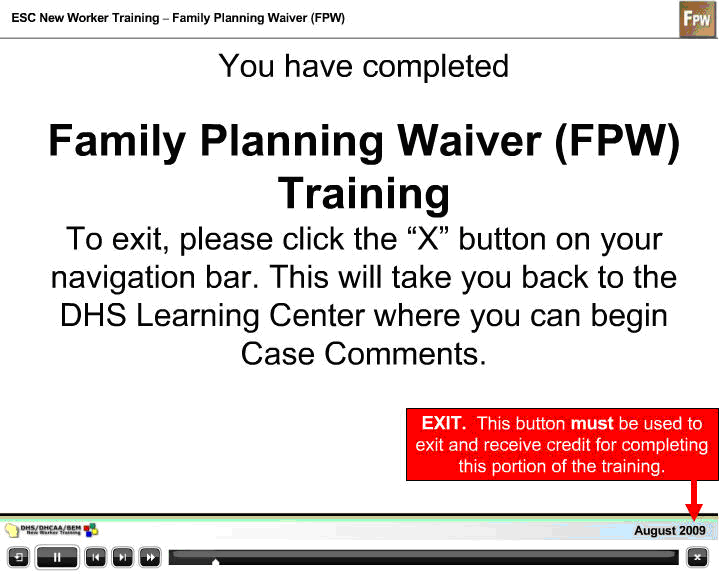
Use this language, or something similar on the last slide of your project. Make sure the arrow lines up with the X in the playbar.
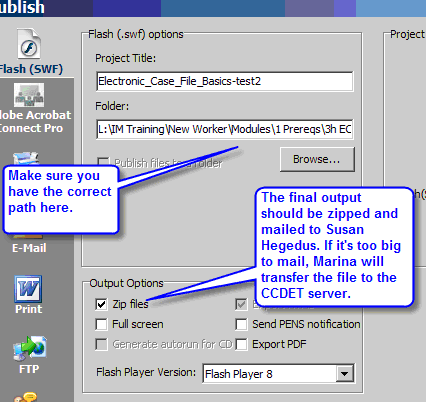
When you’re ready to publish the project, publish it to Flash Version 9.
Put all final Captivate projects in the appropriate subfolder of L:\IM Training\New Worker\Modules. There are subfolders for each specific training module. Each module has a subfolder for the Word, PPT, or Captivate files.
Name the folder the name of the current release. For example, if this is the first release to the training in 2010, the folder should contain “Release 10-01” The first 2 digits are the year and the last 2 digits are the release number for that year. The second release of ECF Basics for 2010 would be “ECF Basics Release 10-02.”
Name the Captivate file something similar. The file should also contain the release number in the filename.
Quizzes –Quizzes should be separated out from the training docs. There’s a separate folder for the quizzes and it also has subfolders for quiz Word, PPT, or Captivate files. See Quiz SCORM Settings for the appropriate settings needed in Pathlore to score quizzes and track trainings.
Warning: Publish the file to the correct folder.
Watch for this as Captivate saves to the folder you last saved to and not necessarily the folder where your . cpt file should be stored.
Do one final review by watching the final version. Find the .htm file in the output folder to start the presentation. If there are no edits, send this .htm link to Melissa for review. Or give instructions for .crev files? Do we still want to use them?
After final approval, publish the project output again to a zip file and email to Susan Hegedus. If it’s too big, Marina will transfer the file.
This page last updated in Release Number: 10-01
Release Date: 05/01/10
Effective Date: 05/01/10