|
|
State of Wisconsin IM Training Handbook Release 10-02 March 16, 2010 |

View History
4.6.1 Capturing Demos Introduction
4.6.5 Inserting a Demo Within Another Captivate File
Do not use any software applications other than Captivate to record demos. Only use Captivate so the demos have a consistent resolution and look and feel.
There are two methods to capture demos for IM training:
Capture a demo that will be the final file for an IM training, or
Capture a demo that will be inserted into another Captivate file. That other file will be the final file for an IM training.
Sometimes these demos are standalone files that are in Pathlore and sometimes a demo is inserted in the middle of another training project.
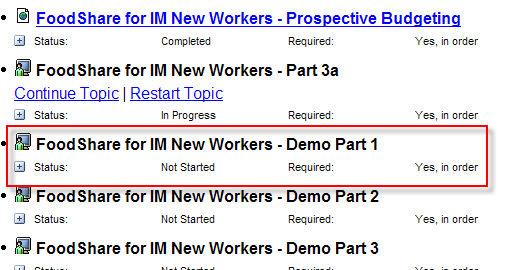
The "FoodShare For IM New Workers- Demo Part 1" in Pathlore is an example of method 1. It is a standalone demo file.
There are several courses where the layout is slides of lecture>a demo> slides of lecture>a demo> slides of lecture, etc. This is an example of a method 2 training course.
Regardless of which method you choose, the demo should also have the resolution set at 1024 x 768. The display resolution on your PC should also be set to this. To check this, in MS Windows, go to the Control Panel> Display> Settings and check that the monitor display is also set to 1024 x 768.
After you complete your demo, you will convert it to 720 x 540. If you don't first capture at the higher resolution, you won't be able to capture the whole screen. There may be times when you only want to capture part of a screen, but during most demos, you will scroll and click all over the browser and that needs to be captured.
When you set up your demo capture, you'll need to create a distinct Captivate project with a name like "FS Demo1."
To start recording a demo in Captivate, go to Start> Programs> Captivate 4. When Captivate opens, choose "Software Simulation" from the Create Project column in the middle of the page.

Choose to record an Application. If you're recording a CWW demo, your application is your browser. Click on the down error in the field and choose the CWW browser.

Then choose to Snap the Recording Rectangle to a custom size of 1024 x 768. Click OK to save.

Make sure you've chosen the "Application" option on this screen. It makes for a better capture.

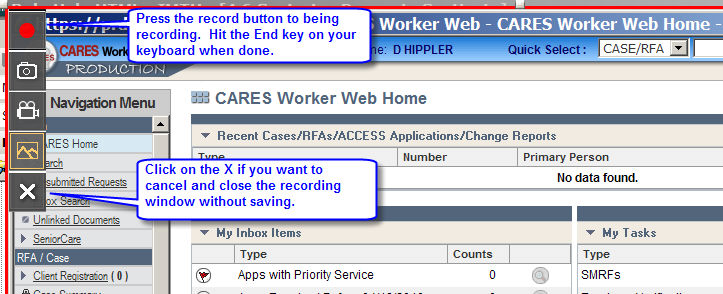
Now you're set up and ready to record. After you click the red "record" button, every action on the screen will be captured. When you're done, hit the "end" key on your keyboard to stop the recording and save the file.
Move your cursor slowly!
Close all other programs and windows that aren't being used. You'll need all the RAM you have.
It's better to have many smaller capture files than one long one. Hit "end" fairly often, take a break, and then continue the demo. A demo shouldn't be done in one huge capture session. This is especially true if you're adding audio to your presentation. A good place to hit "end' is after you click the Next button in CWW. Then continue recording on the next page later.
Before you start adding captions or effects, preview your demo to make sure the text is legible, the cursor isn't moving too fast, or that any errors occurred.
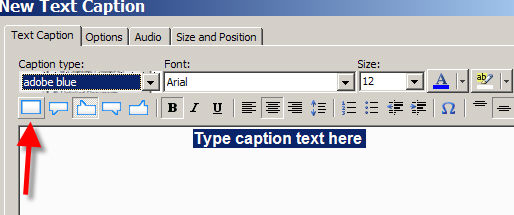
Use captions to emphasize fields or to give information on a page. See 5.1 Collecting Screenshots and 5.2 Working With Snagit for more on this.
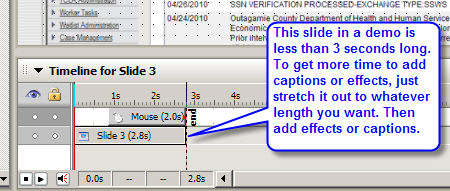
If your demo slide is short and you want to add captions, stretch out the slide on the timeline in Captivate. To the user, this is a seamless transition.
.
If you have a lot of text for captions, consider breaking them into multiple captions that appear one after another. Do this especially if you're pointing to specific fields. That way, you're not blocking as much of the page.
Only use the pointer in Captivate Captions if you're pointing to specific fields or areas of the page. Otherwise, remove the pointer in the caption properties. See 4.2.4 Callouts and Captions for more.
If you need to insert a demo within another Captivate file (See method 2 in 4.6.1 Introduction) make sure you save the demo first. Open the main Captivate project and go to the slide just before where you want to insert the demo. You should have some sort of slide that announces that a demo will follow. Instruct the learner to just watch and not click through. Let them know that they can pause and rewind.
In Captivate, choose File> Import> Slides/Objects.
Choose the demo project from the window.
Select all slides and choose OK.
The demo slides have just been added to your project.
Include a slide that will appear after the demo that let's them know the demo is now done.
Save your project and continue editing.
This page last updated in Release Number: 10-01
Release Date: 05/01/10
Effective Date: 05/01/10